How can I upload my contacts from LinkedIn into Connect 365?
Table of Contents
- Exporting Your LinkedIn Contacts
- Adding Email Addresses of Your Contacts
- Uploading Your Contacts into Connect 365
First and foremost you'll need to ensure your list for uploads has email addresses in it. In most cases you'll need to find the email information before you can upload the contacts.
The most effective route (in terms of accuracy) is to locate the email address from the contact information on your 1st-degree connections' profiles.
There is a process to find and append your file to include email addresses (both the manual route and a more automated route) - Click here for that tutorial!
Exporting Your LinkedIn Contacts
Before you can add your LinkedIn connections into Connect 365, you’ll first need to create a spreadsheet with the pertinent contact information.
This will let our system know who to deliver your messages to AND any other unique prospect information you’d like to include in your messages (ie Name, Company, Job Title).
To get your initial connection information out of LinkedIn, you can export your 1st-degree connection’s First Names, Last Names, Company Names, Job Titles, and The Date You Connected to a spreadsheet through this link: https://www.linkedin.com/psettings/member-data
On the link above, choose the Option for ‘Connections’ (screenshot below).

We recommend updating your spreadsheet to ONLY include the referral partner targets you plan on messaging.
A quick way to restrict your messaging to the NEW connections you have generated as a part of your database build would be to delete connections from your spreadsheet that connected prior to the launch of your database build.
Most often these connection downloads from LinkedIn are provided already sorted with your most recent connections at the top of the spreadsheet. If yours has the most recent connections at the top of your spreadsheet. Skip to Step 3 below.
If I began my database build on August 8, 2020, here’s what I would do.
- Add a filter to the header row in your spreadsheet.
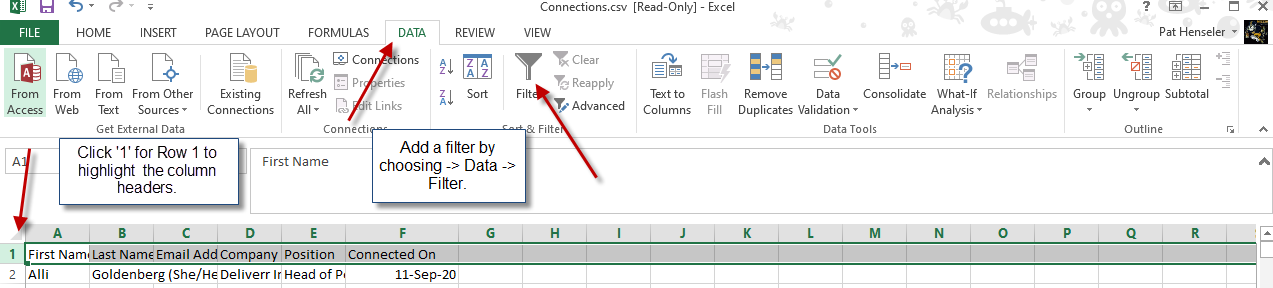
- Click the dropdown on the ‘Connected On’ column and Sort by Newest to Oldest.
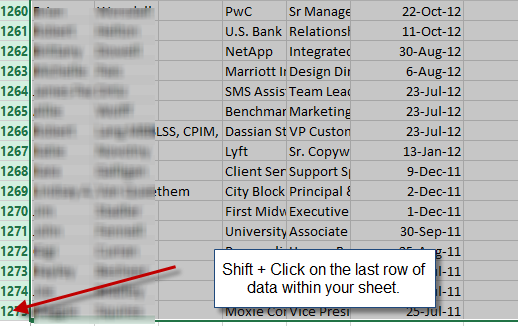
- Click the Row number of the Most recent contact from before your database build. This should highlight all the information for that contact within their row..
- Press SHIFT + Click on the last row of data within your spreadsheet. This should highlight all the cells between the rows in Step 3 and the bottom of your sheet.
- Right-click and Choose ‘Delete.’

The connections you made prior to your database build should now be removed from your spreadsheet.
Now it’s time to append email addresses to your contact list so that our system knows where to send your email messaging campaigns.
Adding Email Addresses of Your Contacts
LinkedIn does not include email addresses within their export. Note - while you may see a handful of connections email addresses included in your download from the section above, the vast majority will need to be added.
The process to do so is fairly straightforward.
First, navigate to your Network and Connections.
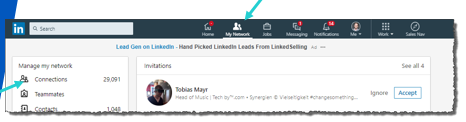
Next, below the ‘Connections Total’ use the ‘Sort by:’ option to view your ‘Recently Added’ connections at the top of the page. You can then visit their profile by clicking their name or picture.
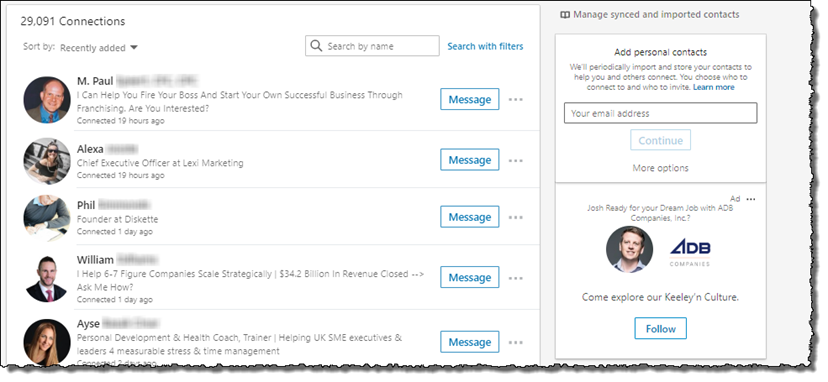
Finally, Click on their Contact Info. Then copy and paste the email address into the proper cell on your spreadsheet for that contact..


100% of your 1st-degree connections may not include the email address. Though we’ve found that on average around 75%+ of connections do.
Repeat the process above for your new connections that you’d like to add into your first messaging sequence with Connect 365.
We recommend launching your first campaign to NO MORE than 100 contacts.
Usually, between 15-75 is the sweet spot for your first send.
If you already have a large list and don't want to go through this process manually - you can download your list from LinkedIn (go here - https://www.linkedin.com/psettings/member-data to do that. That list will not have email addresses. You can use a third party service like GetProspect.io to help you find them. They usually find 60-70% for us. We have a partnership with GetProspect where we are able to offer 100 emails for free on top of what you get with their normal trial account.
LinkedIn Data Export Link - https://www.linkedin.com/psettings/member-data
Have email addresses of contacts that you’d like to add to your campaign who AREN’T from LinkedIn?
Review our training on Getting Your List here for other popular prospecting routes.
Now it’s time to add your connections into Connect 365.
Uploading Your Contacts into Connect 365
You’ll first need to save your spreadsheet with your 1st-degree connections (including their email address) as a .csv file.
This is the file type that LinkedIn will send the original file as. But ensure it is a .csv file type (not a .xls file) before saving.
For a full walkthrough of the upload process, click here for a short tutorial on the upload process.
Note: If you’ve edited your spreadsheet downloaded from LinkedIn, choose ‘Custom’ for the type of upload within Connect 365.
Having an issue with your upload?
Run through our common troubleshooting tips here!
Adding Contacts to Your Campaign
The final step to prepare your contacts to be added into a campaign is to Apply a Tag to your contacts.
Tags are what will let you segment and choose which prospects should receive which message(s).
And that's pretty important! 😉
PRO TIP TIME SAVER: Set up some tags BEFORE importing your contacts so you can auto-tag the appropriate people with your upload.
Learn how to create tags here - https://training.connect365.io/software/create-tags/
Don't feel like you need to create EVERY possible combination of tag from the get go. But it's a good idea to start thinking about how you'll segment your audience.
Are you planning on sending out messages to Editors at publications you'd like to Guest Post on?
You might make a tag called "Guest Post Targets" or "Editors" or "Woodward and Bernstein."
Maybe you have a segment of prospects that have already spoken with your sales team, but they didn't buy - sad face!
But you want to enter them into an email sequence that keeps your name in front of them and provides some quality resources so they will reach out to you when the time is right.
You might create a tag entitled "Long-Term Drip Campaign" or "Post Sales Call Follow-up" or "Baby, Come Back to Me".
I think you get the point. 😉
If you have given the same tag to your contacts as the tag you’ve associated with a specific campaign, those contacts will be set to receive the campaign messaging
You can get a rundown of the entire Campaign Creation and Launch process by viewing the Connect 365 Ultimate Training Guide.